
One of the key features of the PreSearch Tool (a stand-alone application included with Discovery Attender) is the Snapshot. This useful tool provides statistics for the PSTs and on-premises mailboxes that are useful for analysis or early case assessment. The Snapshot scans take a fraction of the time that querying the same data stores would in Discovery Attender.
The Snapshot collects a number of statistics that can be useful to validate that PSTs should be part of larger, more intensive scans. For example, if your search has a specific date range or set of domains, you can run a Snapshot on the entire set in minutes and eliminate anything that is not relevant to the case. When sending data to requestors, you can use the Snapshot to report on total size and attachment breakdown. All views, including those of domains, folders and even relationships between addresses can be exported to CSV files, which are easily opened in Excel. Furthermore, the Snapshot can tell you how many duplicates are within a PST or set of PSTs, which can help you plan your searches more efficiently.
A Snapshot is created using a wizard interface.
-
Open the PreSearch Tool from the Discovery Attender Main Console | Tools file menu option.
-
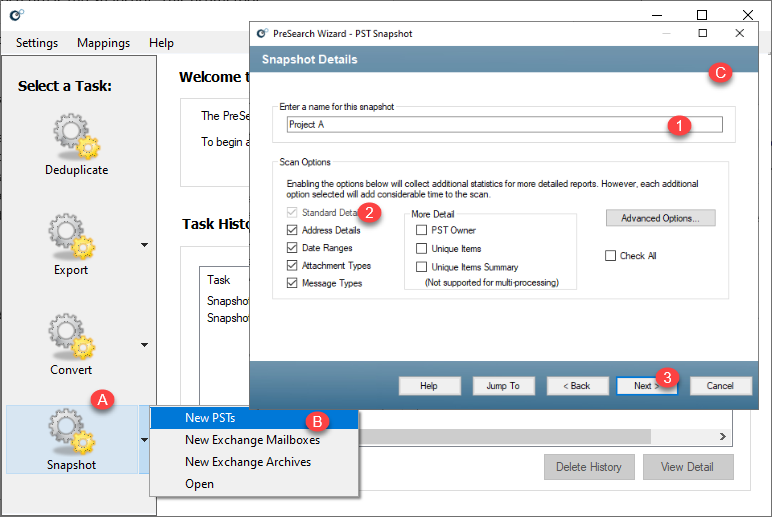
Choose ‘Snapshot’ (A) and ‘New PSTs’ (B) from the menu. This opens the Wizard (C).
-
Click ‘Next’ until you get to the ‘Snap Shot Details’ page which allows you to select the details which you wish to query.
-
First enter a name so you can find the scan in the list of task history in the PreSearch Tool (1)
-
Choose the standard details. We recommend selecting them all (2)
-
Some more advanced details (3) like ‘PST Owner’, ‘Unique Items’ and ‘Unique Item Summary’ will add time to the scan, but still be fare quicker than a Discovery Attender search.
-
-
Continue through the Wizard and click ‘Finish’ to start the scan.
-
A pop-up shows you the progress through the PSTs snapshot scan.
-
Once complete, a new entry is put in the task history.
-
Double-click on the snapshot entry to open the Task Details which gives a high level overview of the task itself.
-
Click on the ‘Breakdown’ button to open the details for the scan.
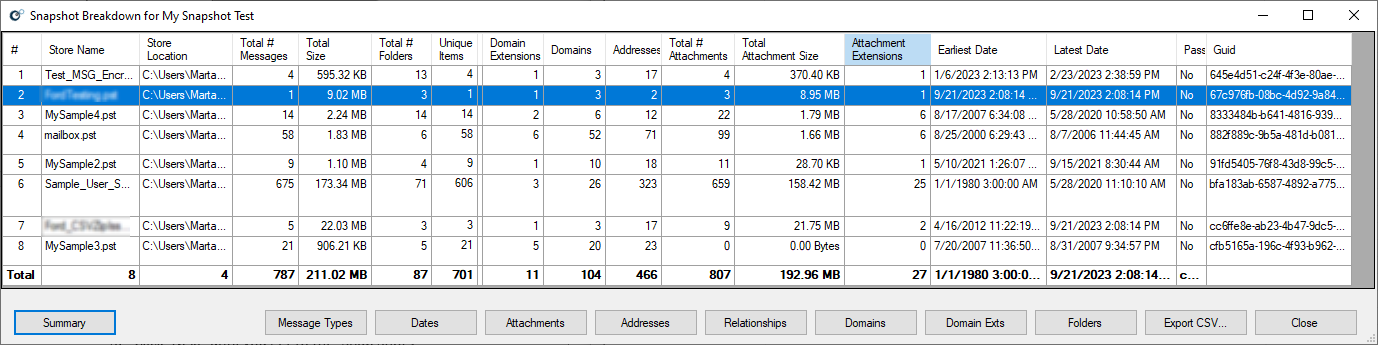
Depending on the options you selected in the wizard, a variety of buttons will be shown. The Summary button will add a Total line to the view which summarizes each column. However, please keep in mind that once the ‘Summary’ is clicked you will not be able to export this view. Simply close the snapshot and reopen it to remove the Total line.
For all other buttons, clicking the associated button will open a report into a new screen including further information about each key area. All reports can be exported to a CSV file.
Don’t hesitate to contact support if you have any questions.
First Published October, 2024