
Summary
The SharePoint Online Retention Conversion Utility (SPORCU) is a tool that identifies SharePoint Online records managed by Gimmal Records that are currently locked using SharePoint’s In‑Place Records Management (IPRM) and converts them to use Microsoft Purview retention labels instead.
This tool should be used once your organization has decided to move from IPRM to Purview label-based record-locking in Gimmal Records.
Please review this entire document before running this conversion.
Prerequisites
Before you attempt to use this application, ensure the following are in place:
-
Gimmal Records SharePoint Online Connector (SPOC) 6.1.1 or above is already deployed and running successfully
-
The existing SharePoint Online connector version 6.1.1 or above is installed and configured
-
You have the following database information available for the SPOC installation:
-
Database server
-
Database name
-
-
-
Purview retention label is ready and configured (see documentation)
-
A Purview retention label has been chosen for this migration.
-
SPOC has been configured to use that label for conversion. See documentation here.
-
-
.Net 4.8.1 is enabled/installed
-
This version is supported only on Windows Server 2022 and 2025, and Windows 10 & 11
-
Windows server versions prior to Windows 2022, and desktop versions prior to Windows 10 are not supported
-
-
Required credentials
-
Credentials to connect to your Gimmal Records database and run a SQL statement
-
Credentials to connect to your SPOC database OR the user account running the SPORCU utility has access to read from the SPOC database.
-
Credentials for an internal Gimmal Records Service Account.
-
-
Access to the utility
-
The SharePoint Online Retention Conversion Utility is installed on your workstation or a utility server. If you have not already done so, please download it here.
-
The machine that the utility is installed on can communicate with the Gimmal Records Manager Web application and the SPO Connector database
-
-
Gimmal Records OData feature is enabled (temporarily if needed)
-
The SPORCU uses the Gimmal Records OData API to retrieve the list of records that need to be converted.
-
If your organization does not normally use OData in production, plan to turn it off again after the conversion is complete (see “After the conversion” below).
-
This feature must be enabled before running the SPORCU. To enable:
-
Run a SQL statement to enable OData against the Gimmal Records database.
-
Add the OData page size setting to the Gimmal Records web configuration file.
-
Locate the web.config file. It is usually located at:
C:\Program Files\Gimmal\Records Management\Web\web.config -
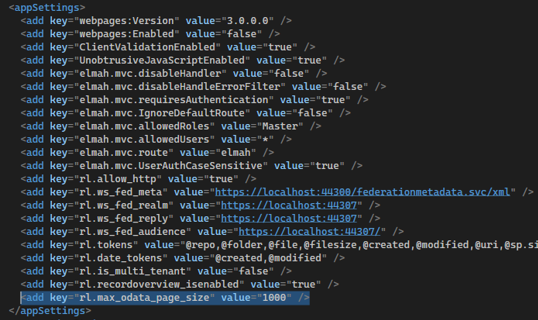
Find the <appSettings> section in the file
-
Add the following after the last setting, above the </appSettings> tag
-
<add key="rl.max_odata_page_size" value="1000" />
-
-
-
Save the file
-
-
Restart the IIS Site for the Gimmal Records web (or issue iisreset).
-
-
Note: If any of these prerequisites are missing, do not continue. Work with your administrator or contact Morae support for assistance.
Configuration
The SharePoint Online Retention Conversion Utility needs to be configured before it can run successfully. The utility will open on the Connection screen.
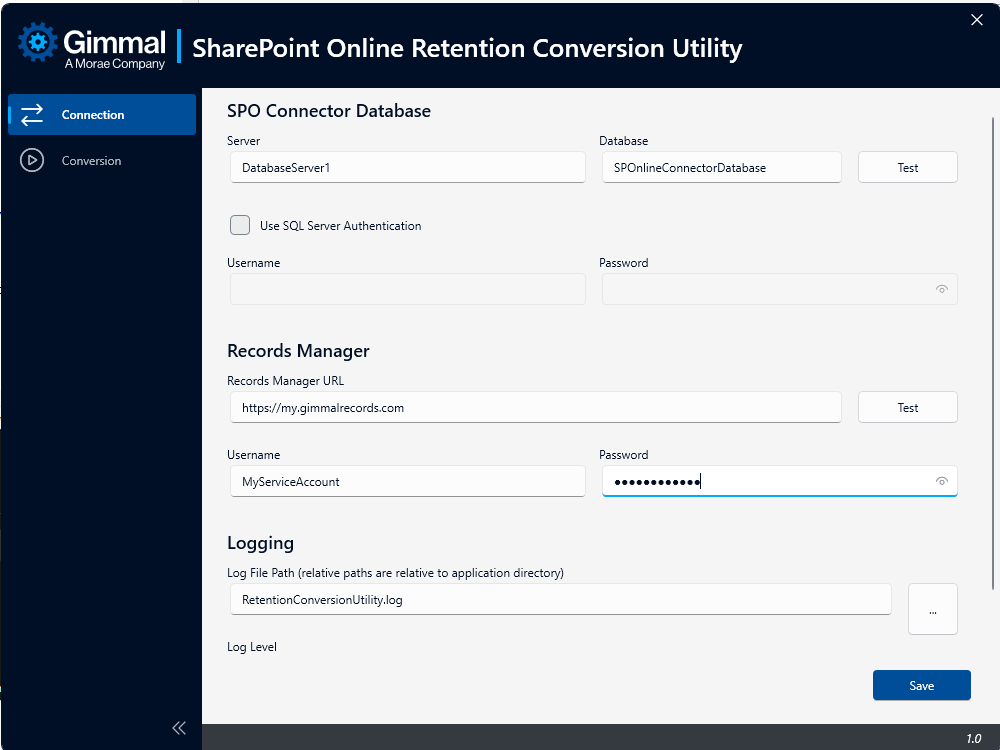
To configure the utility, populate the following information on the Connection tab:
-
SPO Connector Database
-
Enter the server and database name for the SPOC database
-
If the account running this application does not have SPOC database access
-
Check the ‘Use SQL Server Authentication’ box to provide credentials
-
Enter a username and password for an account with read access to the SPOC database
-
-
Use the “Test” button to confirm the tool can connect to the SPOC database
-
If the test fails, verify that the account being used has access and any supplied credentials are correct
-
If the Test succeeds, proceed to the next step to set up the connection to Gimmal Records
-
-
-
Record Manager (Gimmal Records Connection)
-
Enter the Gimmal Records URL
-
Enter the username, and password for a Gimmal Records Service Account
-
Use the “Test” button to confirm the tool can connect to Gimmal Records
-
If the test fails:
-
Confirm the URL opens in a browser
-
Verify that the credentials are for a Service Account
-
Verify that the credentials used are entered correctly
-
-
If the test succeeds, proceed to the next step to enter the details for logging
-
-
-
Logging Configuration
-
Choose a folder where log files should be written (using the “…” button), or accept the default.
-
Leave Log Level at the default value (Standard) unless instructed otherwise by support
-
-
Save
-
Once both tests pass, click Save to store these settings
-
Running a Conversion
Ensure all Connection settings have been tested successfully and saved before running a conversion.
-
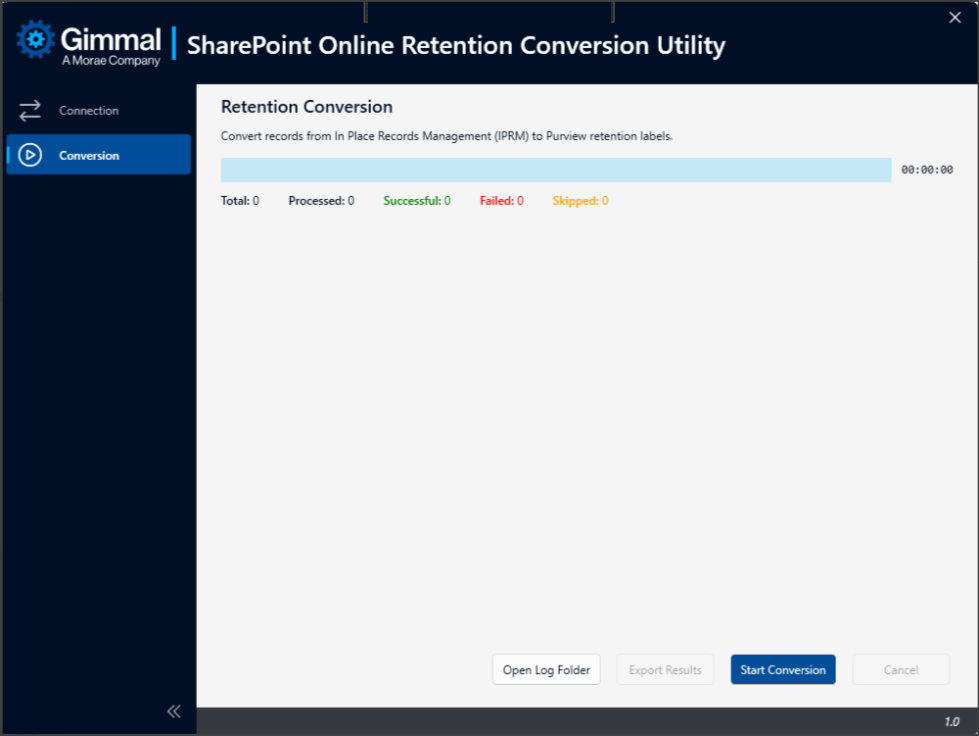
Select the Conversion tab
-
Review the page. You’ll see a Start Conversion button, a Cancel button, a progress bar, and a log area.
-
Click Start Conversion to begin:
-
The tool checks that everything is correctly configured. It then:
-
Gathers the list of records that still use IPRM from the Gimmal Records database
-
Iterates through the list one by one, performing the following steps:
-
Remove the IPRM record lock from the record
-
Apply the Purview retention label to the record
-
If the utility fails any of these steps, it will
-
Reset the IPRM record lock (if possible)
-
Log an error message
-
-
-
-
-
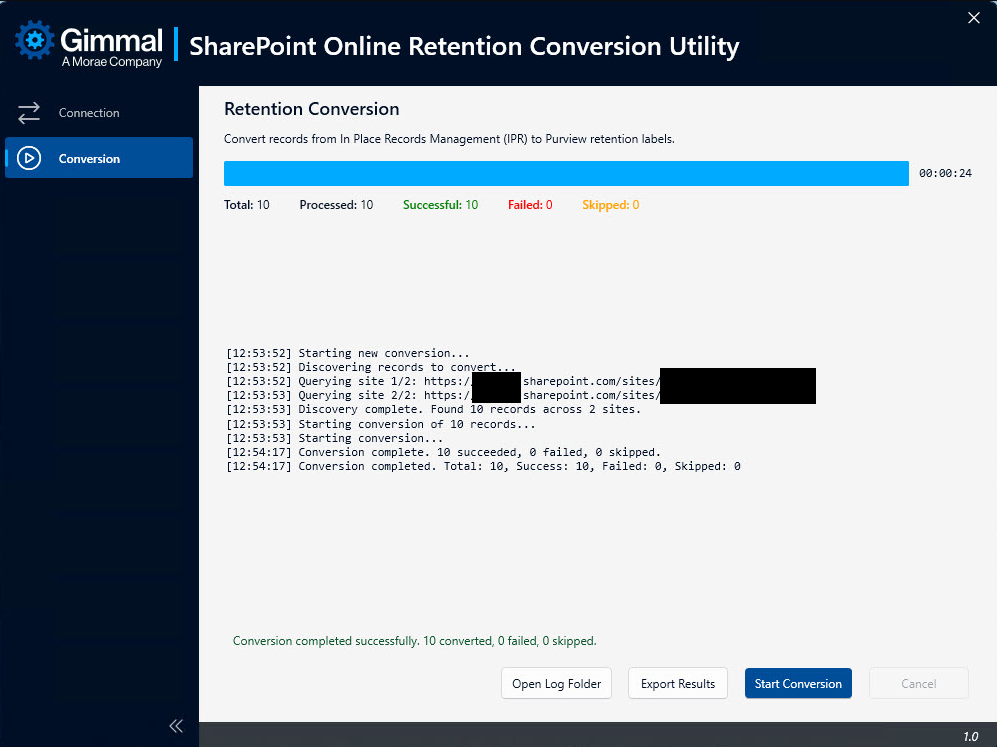
While the conversion process runs:
-
The progress bar and counters show how many items have been processed
-
The log shows a simple text summary of what the tool is doing.
-
-
You can safely leave the utility running for a long time; large migrations may take hours or even days. The speed of the process will depend upon a number of conditions including the environment and the number of records to convert.
-
If you need to stop the conversion, you can click Cancel to safely pause the run. The tool will finish current work, save its place, and stop.
After the Conversion
Once the conversion has completed, please review the summary for any issues. If there are failed or skipped items, please review the Error Handling section.
Note: If OData was enabled only for this migration, it can be disabled by following the steps below. This returns the environment to its normal state if OData is not part of your regular production configuration.
-
Run the SQL statement to disable OData once all conversions (and any retries of failed items) are complete
-
(Optional) Remove the OData configuration setting from the Gimmal Records web configuration file by following these steps:
-
Locate the file: Usually located at: "C:\Program Files\Gimmal\Records\Web\web.config"
-
Find the <appSettings> section
-
Remove the following setting
-
<add key="rl.max_odata_page_size" value="1000" />
-
-
Save the file
-
Restart the IIS site for the Gimmal Records web (or iisreset)
-
Error Handling and Restarts
The tool is designed to handle interruptions and can continue where you left off.
Connection Problems
If the tool shows errors about:
-
The Database Connection, or
-
The Gimmal Records connection
then:
-
Return to the Connection screen.
-
Re‑enter the details and use the Test buttons.
-
If tests keep failing, contact Morae support and provide:
-
A short description of the steps you were following
-
Any error text shown on screen (screenshots are preferable)
-
Setup Issues
If the tool shows a message that retention labels are not enabled or not configured:
-
This means the label has not been configured in SPOC itself, or it has not been enabled for Gimmal Records
-
Do not continue.
-
Ask the SPO Connector / Gimmal Records administrator to complete the configuration of label-based record locking. Please refer to this article.
Stopped or Failed Runs
If a conversion run is cancelled, stops unexpectedly, or finishes with some failures:
-
When you return to the Retention Conversion screen, you may see:
-
A message about an incomplete run with an option to Resume Conversion, or
-
A message about a completed run with failed items with an option to Retry Failed Items.
-
You can then choose to:
-
Resume Conversion – continue an incomplete run where it left off.
-
Retry Failed Items – re‑run only the records that previously failed.
-
Start Conversion – starts the conversion from the beginning by running a new query of the records left to convert. You will be asked to confirm. Note:
-
Records converted in a previous run will not be reprocessed
-
Screenshot the current screen before running a new conversion as the old run will be discarded
-
Backup the log file before running to keep the old run details
-
Getting Help
If you need to involve Morae Support:
-
On the Retention Conversion screen, click Open Log Folder to get the log files.
-
Optionally click Export Results to create CSV files showing which records succeeded or failed.
-
Share the relevant log file and CSV export along with a brief description of the issue. Screenshots are helpful.
SQL Statements
Enable OData
DECLARE @ODataKey NVARCHAR(260) = '{5EC3A20C-E793-4653-90F7-4C6A192AE2E3}'

IF NOT EXISTS (SELECT 1 FROM [dbo].[KeyValues] WHERE [Key] = @ODataKey)

BEGIN

  INSERT INTO [dbo].[KeyValues]

  ([Key], [Value])

  VALUES

  (@ODataKey, 'true')

END

ELSE

BEGIN

  UPDATE [dbo].[KeyValues]

  SET [Value] = 'true'

  WHERE [Key] = @ODataKey

END
Disable OData
DECLARE @ODataKey NVARCHAR(260) = '{5EC3A20C-E793-4653-90F7-4C6A192AE2E3}'

UPDATE [dbo].[KeyValues]

SET [Value] = 'false'

WHERE [Key] = @ODataKey